Thursday, July 22, 2010

BPEL Performance – Tips & Tricks – 1

Dehydration Tuning

Dehydration tuning is required during CPU and Memory heavily utilized.

BPEL stores all the instances in the dehydration store during mid-point activities (onMessage, Receive, wait, onAlarm) also stores the instances during end of transaction.

1. auditLevel

Audit trial logging level is a domain level setup can be configured in BPEL console. Below settings controls the amount of audit events logged by a process. Audit trial is set to all types of processes.
  • off - absolutely no logging performed whatsoever; may result in a slight performance boost for processing instances.
  • minimal - all events are logged; however, no audit details are logged.
  • production - all events are logged. The audit details for assign activities are not logged; the details for all other nodes are logged.
  • development - all events are logged; all audit details for all activities are logged.
2. completionPersistPolicy

This setup can be done in both process and domain level. This configuration are done in Transient or short living processes. This setting will decide whether and when to save the instance.

This property controls if and when to persist instances. If an instance is not saved, it does not appear in Oracle BPEL Control. This property is applicable to transient BPEL processes.

This property is only used when inMemoryOptimization is set to true for transient bpel process.
This property has the following values:
  • on : (default): Completed instances are saved normally.
  • deferred : Completed instances are saved with a different thread and in another transaction. If a server fails, some instances may not be saved.
  • faulted : Only faulted instances are saved.
  • off : No instances (and their data) are saved.
3. completionPersistLevel

This property can be configured in both process and domain level. This configuration is done in transient or short living processes. This setting will control the amount of instance state saved to database.

This property is used only when the inMemoryOptimization performance property is set to true for transient bpel process. Use the completionPersistLevel property in conjunction with the completionPersistPolicy property.

This property has the following values:
  • all (default) : Oracle BPEL Server saves the complete instance, including the final variable values, work item data, and audit data. This setting causes the database to grow in size.
  • instanceHeader : The Oracle BPEL Process Manager saves only the instance metadata.
Process Level Dehydration Tuning

<BPELSuitcase>
<BPELProcess id="CreditRatingService“ src="CreditRatingService.bpel">
<partnerLinkBindings>
<partnerLinkBinding name="client">
<property name="wsdlLocation">CreditRating.wsdl</property>
</partnerLinkBinding>
</partnerLinkBindings>
<configurations>
<property name="inMemoryOptimization">true</property>
<property name="completionPersistPolicy">faulted</property>
<property name="completionPersistLevel">all</property>
</configurations>
</BPELProcess>
</BPELSuitcase>

Friday, July 16, 2010

BPEL Best Practices

-Use Assign activity instead of Transform Activity where ever possible since it take less memory.

–Do not import or add XSD files in a ZIP file into a BPEL project. Always extract the XSD files from a ZIP file before importing them.

–Do not include any special characters in the project name (such as periods). If you do include special characters, errors appear when you attempt to compile your project

–The bpel.xml file content is only read into memory when the file is opened. Therefore, if you change the content of bpel.xml after the file is opened, the changes are not made in memory. After changing the content of the BPEL file, close and reopen the file for the changes to take effect.

–Do not edit the bpel.xml file through a combination of Oracle JDeveloper and a text editor such as Notepad or Wordpad. Use only a single editing environment such as Oracle JDeveloper.

–Do not edit the bpel.xml file, BPEL files, and WSDL files while changing the
design of the process. If you want to edit a file:
1. Ensure that the BPEL files are not being edited in Oracle JDeveloper. If they are being edited (that is, a tab for that file is visible), close it and save changes as needed.
2. Edit the required file and save the changes

–Oracle BPEL Process Manager does not support SOAP-encoded arrays.(soapenc:arrayType).
Use one of the following workarounds:
* Apache Axis supports document-literal style services. This means you can change the service to not use soapenc:arrayType.
* A wrapper can be placed around the service (also using Apache Axis) so that the BPEL process talks to the document literal wrapper service, which in turn calls the underlying service with soapenc:arrayType.
* Call a service with soapenc:arrayType from BPEL, but construct the XML message more manually in the BPEL code. This enables you to avoid changing or wrapping the service. However, each time you want to call that service from BPEL, you must take extra steps

–If you use large binary attachment files in SOAP messages with Oracle Database Lite, your BPEL process may not complete processing, which can cause you to run out of system memory. Oracle Database Lite is largely for testing purposes. To use large binary attachment files in SOAP messages, use an Oracle Database as your dehydration store

–Use TCP tunneling to view SOAP messages exchanged between the BPEL process flow and the Web service (including those containing the
correlation ID). You can see the exact SOAP messages that are sent to, or received from, services with which a BPEL process flow communicates.

–Instead of manually entering an expression, you can press Ctrl and then the space bar in the Expression field. Scroll through the list of values that appears and double-click the value you want. Edit the value as necessary. As you enter information, a trailing slash can appear. This means you are being prompted for additional information. Either enter additional information, or press the Esc key and delete the trailing slash to complete the input of information.

–Do not copy and paste the expression syntax shown in this document into Oracle JDeveloper. This is because the single and double quotation marks are sometimes not compatible with Oracle JDeveloper. Instead, use the Expression Builder window or press Ctrl and then the space bar to use the XPath Building Assistant.

–When you deploy a process with the same name and version, you are prompted to overwrite the currently-deployed BPEL process or deploy to a new version number. The best practice is to always deploy to a new version (as described in this tutorial). Redeploying a process with the same version can have consequences, such as instances being marked as stale.

Monday, May 17, 2010

Invoke BPEL using Java API

This article helps you in kick start of creating your own BPEL console or automate program to do certain activities which BPEL console can perform.

All the operations performed in BPEL console can be created using the java API.

BPEL processes can be invoked using a Java API. The API will differ depending upon the type of operation involved. One way operation has an input message without result. Two way operations send and receive the message.

Refer Java API : http://download.oracle.com/docs/cd/B31017_01/integrate.1013/b28986/toc.htm

Note: orabpel.jar files should be added in the classpath


package com.bpel.client;

import com.oracle.bpel.client.*;
import com.oracle.bpel.client.dispatch.*;

import java.util.Map;
import java.util.Properties;


public class InvokeBPEL
{

/**
*
* @author Ziaur Rahuman S
*/
public static void main(String[] args)
{

Properties props = new Properties();

props.setProperty("orabpel.platform", "ias_10g");
props.setProperty("java.naming.factory.initial",
"com.evermind.server.rmi.RMIInitialContextFactory");
props.setProperty("java.naming.provider.url",
"opmn:ormi://hostname:6003:oc4j_soa/orabpel");
props.setProperty("java.naming.security.principal", "oc4jadmin");
props.setProperty("java.naming.security.credentials", "oc4jadm1n");
props.setProperty("dedicated.connection", "true");


String xml = "<SyncHelloWorldProcessRequest><input>World</input></SyncHelloWorldProcessRequest>";

try {
// Create instance of Locator object with domain name and password as arguement
Locator locator = new Locator("ocoetest", "oc4jadm1n", props);
IDeliveryService dService = (IDeliveryService) locator.lookupService(IDeliveryService.SERVICE_NAME);

// Create normalized message with payload
NormalizedMessage nm = new NormalizedMessage();
nm.addPart("payload", xml);

// Invoke two way operation
NormalizedMessage response = dService.request("SyncHelloWorld","process",nm);
Map payload = response.getPayload();

// Invoke one way operation
//dService.post("AsyncHelloWorld","initiate",nm);

System.out.println("SyncHelloWorld Invoked Successfully !!!");

} catch (Exception e)
{
e.printStackTrace();
}


}
}


Friday, May 7, 2010

Different ways of deploying BPEL process

BPEL process can be deployed in different ways. This article will show the different possible way of deploying the BPEL process.


1, Deploy using JDeveloper


It’s the regular deployment using the jdeveloper by selecting the deploy option in the bpel process as shown in the below screen shot.


2, Deploy using BPEL Compiler


1, Open command prompt

2, set oracle bin path (set PATH=C:\oracle\bpel\integration\orabpel\bin;%PATH%)

3, C:\>bpelc -rev 1.0 -deploy default C:\oracle\bpel\integration\jdev\jdev\mywork\D

emoWS\HelloWorld\bpel.xml

Syntax:

bpelc (BPEL Compiler) (<SOA_HOME>\integration\bin> bpelc –rev[ver no] –deploy [domainname] <Path of the bpel.xml>


3, Deploy using OBANT


1, Open command prompt

2, set oracle bin path (set PATH=C:\oracle\bpel\integration\orabpel\bin;%PATH%)

3, Navigate to BPEL process directory, where the build.xml file resides(ex: C:\oracle\bpel\integration\jdev\jdev\mywork\DemoWS\HelloWorld)


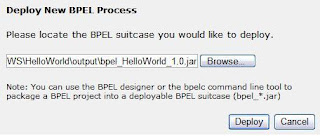
4, Deploy using BPEL Console


1, Open BPEL Console

2, Click BPEL Process tab -> Deploy New Process link

3, Browse to the BPEL process jar file and click deploy


5, Deploy by placing the jar in deploy folder


Above 4 scenarios’ of deployment works for 10.1.2 and 10.1.3 versions of BPM. This scenario of copying the bpel jar file will work only for 10.1.3 and above versions.

1, Copy the jar file into <BPEL_HOME>\integration\orabpel\domains\default\deploy folder.

2, Check <BPEL_HOME>\integration\orabpel\domains\default\tmp folder, created with the copied bpel suitcase.


Friday, April 23, 2010

Java program to get the input xml/receive data from bpel instance

This java program helps in recover the input message for the given set of instances. The BPEL process name and instance id should be given as input in the instances.txt file as shown below.

SyncHelloWorld=370001
SyncHelloWorld=370002

BPELInstance.java

package client;

import com.oracle.bpel.client.IBPELDomainHandle;
import com.oracle.bpel.client.IInstanceHandle;
import com.oracle.bpel.client.Locator;
import com.oracle.bpel.client.ServerException;
import com.oracle.bpel.client.util.WhereCondition;

import java.io.File;
import java.io.IOException;
import java.io.StringWriter;

import java.util.Properties;
import java.util.Scanner;

import javax.xml.transform.Transformer;
import javax.xml.transform.TransformerFactory;
import javax.xml.transform.dom.DOMSource;
import javax.xml.transform.stream.StreamResult;

import oracle.xml.parser.v2.XMLDocument;

import org.w3c.dom.NodeList;


public class BPELInstance {
public static void main(String[] args) throws ServerException,
IOException {
try {

Properties props = new Properties();
WhereCondition whCnd;
String processName;
Locator locator;
int value;

props.setProperty("orabpel.platform", "ias_10g");
props.setProperty("java.naming.factory.initial",
"com.evermind.server.rmi.RMIInitialContextFactory");
props.setProperty("java.naming.provider.url",
"opmn:ormi://hostname:6003:oc4j_soa/orabpel");
props.setProperty("java.naming.security.principal", "oc4jadmin");
props.setProperty("java.naming.security.credentials", "password");
props.setProperty("dedicated.connection", "true");

locator = new Locator("default", "password", props); // Provide the domain name and password
System.out.println("Connected to the Server");
File fFile =
new File("C:\\Zia\\Automation\\Client\\instances.txt");
Scanner scanner = new Scanner(fFile);
IBPELDomainHandle domain = locator.lookupDomain();
while (scanner.hasNextLine()) {
Scanner scanner1 = new Scanner(scanner.nextLine());
scanner1.useDelimiter("=");
if (scanner1.hasNext()) {
processName = scanner1.next();
value = Integer.parseInt(scanner1.next());
//System.out.println("ProcessName = " + processName + " Instance = " + value);
WhereCondition whereProcessId =
new WhereCondition("process_id = ?");
whereProcessId.setString(1, processName);
whCnd = new WhereCondition("cikey = ?");
whCnd.setInt(1, value);
whereProcessId.append("and").append(whCnd);

IInstanceHandle instances[] =
locator.listInstances(whereProcessId);
if (instances != null && instances.length > 0) {
System.out.println("*** Recovering " + processName +
"[" + value + "] ***");
String auditTrail = instances[0].getAuditTrail();
//System.out.println("\n\n"+auditTrail);
XMLDocument xmlDoc =
Utility.getXMLDocumentFromString(auditTrail);
if (xmlDoc != null) {
NodeList nodeList =
xmlDoc.selectNodes("//details[@id]");

if (nodeList != null) {
System.out.println("@@@@@@@@@" +
nodeList.getLength() +
"@@@@@@@@@");
if (nodeList.getLength() > 0) {
System.out.println("### Getting the data from AuditDetails ###");
String auditDetails =
instances[0].getAuditDetails(0);
System.out.println(auditDetails);
} else {
System.out.println("### Getting the data from AuditTrail ###");
XMLDocument xmlDoc1 =
Utility.getXMLDocumentFromString(Utility.getNodeValueByXPath(xmlDoc,
"/audit-trail/event/details/text()"));
NodeList nl =
xmlDoc1.getDocumentElement().getElementsByTagName("part");
StringWriter sw = new StringWriter();
Transformer serializer =
TransformerFactory.newInstance().newTransformer();
serializer.transform(new DOMSource(nl.item(0).getFirstChild()),
new StreamResult(sw));
String result = sw.toString();
System.out.println(result);
}
}
//System.out.println("******************* End Recovery Steps ***********************");
}
}
}
}
} catch (Exception e) {
e.printStackTrace();
}
}
}

Output

Connected to the Server
*** Recovering SyncHelloWorld[370001] ***
@@@@@@@@@0@@@@@@@@@
### Getting the data from AuditTrail ###
<?xml version="1.0" encoding="UTF-8"?>
<ns1:SyncHelloWorldProcessRequest xmlns:ns1="http://xmlns.oracle.com/SyncHelloWorld">
<ns1:input>JavaTest</ns1:input>
</ns1:SyncHelloWorldProcessRequest>
*** Recovering SyncHelloWorld[370002] ***
@@@@@@@@@0@@@@@@@@@
### Getting the data from AuditTrail ###
<?xml version="1.0" encoding="UTF-8"?>
<ns1:SyncHelloWorldProcessRequest xmlns:ns1="http://xmlns.oracle.com/SyncHelloWorld">
<ns1:input>OracleSoaTest</ns1:input>
</ns1:SyncHelloWorldProcessRequest>


Wednesday, April 21, 2010

Deploy JCA BRM Adapter and Create Connection Factory

This post helps in deploying the JCA BRM Adapter and Creating the connection factory in Oracle Application Server.

Deploy JCA BRM Adapter

1. Stop Application Server.

Edit application.xml file as shown below.

<import-shared-library name="oracle.bpel.common"/> tag

inside <imported-shared-libraries> tag into the following file.

<SOA_HOME>/j2ee/oc4j_soa/config/application.xml.

After adding into the application.xml it will look like this.

<!-- Comment this if you don't want to access OracleAS JMS via
the JCA framework
-->
<resource-provider class="com.evermind.server.jms.Oc4jResourceProvider"
name="oc4jjms">
<description>oc4j-jms loop back resource provider</description>
<property name="dummy" value="dummy"/>
</resource-provider>
<imported-shared-libraries>
<import-shared-library name="adf.oracle.domain"/>
<import-shared-library name="oracle.bpel.common"/>
</imported-shared-libraries>

</orion-application>

2. Start Application Server:

Without this entry BRM Adapter installation will get failed. But after successful installation of BRM adapter we have to remove this entry or else none of the BPEL or ESB processes will get loaded.

3. Deploy using Application Server Control

i) Open the AS main page, and navigate to Application Server Control (http://hostname:port/)
ii) Select the instance oc4j_soa (container where the application or AIA is running).
iii) Select Application to see the list of deployed applications
iv) Click on deploy to deploy the BRM Adapter
v) Select Adapter RAR file (OracleBRMJCA15Adapter.rar) get this rar file from BRM Administrator.


vi) Specify a valid name (name should not contain spaces, special characters etc) then click on next.


vii) Click on Deploy, optionally you can save the Deployment plan by clicking "Save Deployment Plan" and specifying a path for the .dat file.


viii) Click Return, Once the adapter is deployed successfully.


Create Private Connection Factory


1) Click on create to create the connection factory.


2) Click on Continue


3) Set JNDI location to eis/BRM and check Use Private Connection Pool. Also provide the BRM server details(Connection String).


4) Click Finish

BRM Adapter Post Installation Tasks

1) Stop Application Server and remove entry as below from application.xml

<SOA_HOME>/j2ee/oc4j_soa/config/application.xml file

<import-shared-library name="oracle.bpel.common"/>

2) Add below highlighted entry in oc4j-ra.xml of BRMAdapter which can be found at following location.

<SOA_HOME>/j2ee/oc4j_soa/application-deployments/default/BRMAdapter.

After adding into the oc4j-ra.xml it should look as shown below

<connector name="BRMAdapter" path="BRMAdapter.rar">
</connector>

<oc4j-connector-factories xmlns:xsi="http://www.w3.org/2001/XMLSchema-instance" xsi:noNamespaceSchemaLocation="http://www.oracle.com/technology/oracleas/schema/oc4j-connector-factories-10_0.xsd" schema-major-version="10" schema-minor-version="0" >
<imported-shared-libraries>
<import-shared-library name="oracle.bpel.common"/>
</imported-shared-libraries>
<connector-factory location="eis/BRM" connector-name="BRMAdapter">
<config-property name="ConnectionString" value="ip hostname 12006"/>
<config-property name="DBNumber" value="1"/>
<config-property name="PoidID" value="1"/>
<config-property name="ServiceType" value="/service/pcm_client"/>
<config-property name="LoginType" value="1"/>
<config-property name="UserName" value="root.0.0.0.1"/>
<config-property name="Password" value="&aes|08|0D5E11BFDD97D2769D9B0DBFBD1BBF7E5D40C305EDF3D77DF111AAB8F781E92122"/>
<config-property name="InputValidation" value="false"/>
<config-property name="OutputValidation" value="false"/>
<connection-pooling use="private">
<property name="waitTimeout" value="300" />
<property name="scheme" value="fixed_wait" />
<property name="maxConnections" value="50" />
<property name="minConnections" value="0" />
</connection-pooling>
<security-config use="none">
</security-config>
<connectionfactory-interface>oracle.tip.adapter.api.OracleConnectionFactory</connectionfactory-interface>
</connector-factory>
</oc4j-connector-factories>

3) Start the server again

Monday, April 19, 2010

How to change the end system(Siebel/BRM) in AIA for Communication PIP

This document helps in changing system (Siebel/BRM) of AIA for Communication PIP. This document limited only to the configuration changes in AIA and FMW to point to new end systems.


1. Prerequisites

Collect below end system information before making the changes.

Siebel :
Hostname :
PortNo :
UserName :
Password :
PriceList Id:

Siebel JMS DB Connection :
JMS Username :
JMS Password:
TNS entry of JMS Queue(DB Hostname and SID) :

BRM
Hostname :
Port :
Username:
Password:
DB Hostname:
DB Port:
DB SID:

2. AIAConfigurationProperties

Take a backup of AIAConfigurationProperties.xml located at <AIA_HOME>/config/ and start editing below datas for end system change.

Change Siebel Endpoint URI and PriceList.

<Property name="Routing.Target.Default.SiebelProductService.EndpointURI">Siebel_URI</Property>
<Property name="Siebel.PriceList.ID">1-260Z</Property>


3. Application XML Change

Make a copy of Application.xml at location <SOA_HOME>/j2ee/oc4j_soa/config/ and edit Application.xml by pasting below entries with changed values.

Siebel AIA DBConnect jms resource provider

<resource-provider name="DBConnect1" class="oracle.jms.OjmsContext">
<description>Siebel AIA DBConnect jms resource provider</description>
<property name="password" value="jmsuser" />
<property name="username" value="jmsuser" />
<property name="url" value="jdbc:oracle:oci:@(Description=(ADDRESS_LIST=(ADDRESS=(PROTOCOL=TCP)(HOST=HOST_NAME)(PORT = 1521)))(CONNECT_DATA=(SERVICE_NAME=service_name)))" />
</resource-provider>

4. BRMAdapter Change

Make a copy of oc4j-ra.xml at location <SOA_HOME>/j2ee/oc4j_soa/application-deployments/default/BRMAdapter/ and edit the oc4j-ra.xml with values that you need to change for the BRM system.

<config-property name="ConnectionString" value="ip 10.62.5.10 40115"/>
<config-property name="DBNumber" value="1"/>
<config-property name="PoidID" value="1"/>
<config-property name="ServiceType" value="/service/pcm_client"/>
<config-property name="LoginType" value="1"/>
<config-property name="UserName" value="root.0.0.0.1"/>

5. Data Source Change


Make a backup of data-sources.xml at location <SOA_HOME>/j2ee/oc4j_soa/config and edit the file by making changes in PortalEvenAQPool with provided BRM inputs.

<connection-pool name="PortalEventAQPool">
<connection-factory factory-class="oracle.jdbc.pool.OracleDataSource" user="pin15" password="pin15" url="jdbc:oracle:thin:@HOST_NAME:1521:SID" commit-record-table-name=""/>
</connection-pool>

6. AIA Console Change

Login to AIA console http://fmw_server:7777/AIA

1) Click on Setup
2) Click on System
3) Change the endsystem connectivity